Tuesday, April 10, 2012

Nursery Idea Board.

Good Morning! I don't know about you but around here we've had some pretty early mornings as of late but that is probably a good thing seeing as how the days are beginning to fly by until the arrival of baby, I start some classes, family comes to visit and we ourselves will be heading out of town and there is still much work to be done in our little house before all of these things take place. The home improvements are sailing along quite nicely and we are getting really excited for the culminating project, the nursery! 
I decided to work on this lastly since he shouldn't be here demanding attention until late-ish June and the majority of our home is in immediate desperate need of some TLC. Although it will be a while before I get started I've made a little idea board to share with everyone the projected vision for the nursery and to remind myself not to forget any of the really awesome details.

This is the fabric that started it all. We had a big baby/stroller blanket made out of this fabric for us and I just love it. When our boy is big enough to sleep with actual blankets and things I might get a little duvet cover made from it, until then though it will be folded over the side of his crib and used for snuggling our sweet baby. My favorite part of the fabric was the little gray birch trees, I love the color gray in nurseries and I was so excited that the fabric incorporated gray with orange and blue.


I like this warm gray for the walls, it's the same gray that is in the birch trees and it will allow us to use gray in a huge area without it feeling too cold.
This is a picture of the EXACT same dresser that we found on craigslist for 45$, which is a steal!!!! I don't know if you've ever priced these dressers but if you want to shock yourself just google mid-century modern dressers one day. I'm going to paint just the outside of the dresser except for the drawers so the end result will be something like this(left) but in frozen vanilla(right) instead of green.


The fabulous thing about this dresser is that it's size will allow us to use it as a dresser and a changing table!
This brings us to our fabulous crib that my husbands parents bought for us. I think it's really great and classic with it's wide square rails.


I found this fabric in the same collection as the baby blanket fabric and it coordinates perfectly with our little guy's blanket. when the crib gets here and I can take all the proper measurements I'm going to order some of this pumpkin orange fabric and make a bed skirt for his crib. Because of all the safety precautions we must take with baby's they don't seem to have very comfy or cute things in their cribs, but a colorful bedskirt is a perfect way to add color safely. 
A few months ago before we ever left Virginia we paid one last visit to Ikea ( sigh ) to pick up this great rug for the nursery for only $19.00! It totally matches the birch trees in the blanket fabric, they look just like a stylized drawing of trees with lines, just like this rug and since we have all wood floors it's a great way to cut down on noise and soften our baby's room.
My Mamaw's very orange chair has finally found it's place. It's going to tie in great with the color scheme and I'm glad the nursery will have a comfy place to sit since I feel I may be spending lots of time in that room.


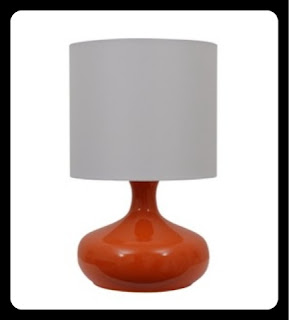
Accessories! I love accessories. This target lamp will be a great addition to the top of the dresser. I'm thinking that this vintage egg basket I found at a local antique store will be perfect on the floor beside the arm chair to hold stuffed animals (the basket doesn't look it in the picture but it's pretty huge!) And this ceramic garden owl will look phenomenal in a pair to use as book ends on a shelf.
These little guys are two more accessories that I'm hoping will add some accent colors from the blanket into the room. The cute toadstool clock is going up on the wall over the dresser along with a few other items and pictures and the little yellow fox will sit snuggly in the orange chair.


These are some great 11x14 posters that I came across on Etsy. I may buy a few of these or create my own to hang on the wall over the dresser to add some color and fun art to the walls. 

That's all I have for now, I'm sure I'll come up with more and I will be sure to post pictures as the room get complete, I hope you enjoyed this for now!




Wednesday, April 4, 2012

Color Theory.

I love ironic color schemes! What I mean by this is colors that you wouldn't normally put together, colors that aren't traditionally grouped together and labeled as "matching", but when you pair them they perfectly compliment each other's uniqueness. I see this a lot in J. Crew catalogs and it inspires me. One of my favorite ironic color combos is aqua and orange, so I was completely thrilled when we moved into our new house and our laundry room was painted a very pale aqua.


I repainted all the white trim and the door to freshen up the room and put down a tan grass rug that we had and a shoe rack just inside the door. In our neighborhood all the parking is behind the houses so we always use this back door, this made our rug and shoe rack a necessity. I made curtains from black and white chevron fabric. I searched for curtains like these on the internet but found the fabric here and it was much more economical to make the curtains myself than to buy the curtains pre-made.                                                                                   


The white shelves were up when we moved in and the black fabric baskets we previously owned that hold all our cleaning and laundry supplies and we added a jar to store laundry detergent in. I used remaining fabric from the curtains to cover our ironing board. 

I hung up black hooks in different locations around the room to hang up brooms/steam mops/Chewie's leash etc. The orange laundry basket is a find from our local hardware store, I love the way it looks against the aqua wall. The window is a window into our pantry which is really great for letting natural light into our pantry. I want to find other ways to incorporate orange into the laundry room. Do you use any ironic color schemes in your home? What are your favorite nontraditional color schemes?

Monday, April 2, 2012

A Classy Faker.

I've taken about a month and a half long hiatus from blogging anything in order to move in to our new home and to start making it livable. Hopefully soon I can put the finishing touches on the living room, laundry room, kitchen and bathroom and  put up before and after pictures of those rooms in our little abode. 
In the past few days I've been finishing the bathroom, Alex and I put up a pendant light in the bathroom  but for about a week it has just been a bare bulb with no shade. I had been wanting something classy and glassy to compliment the glass drawer pulls and fancy gold molding in the bathroom. I wanted something like this.........


But my budget does not allow for a $300 Lamp, so I decided to get crafty and create my own classy glassy chandelier. Here's how...


1. Gathering supplies, you'll need a hot glue gun and glue sticks, two metal rings of different sizes(your choice of size dependent upon how big you want your chandelier), fishing line, bead garland(make sure you have plenty I had 90 ft and used every bit of it) which I purchased here. You may also want a measuring tape or a ruler unless you just want to eyeball it.

2. Attach the end of your bead strand to the metal ring using your fishing line to secure it tightly.
3. Cut a long piece of fishing line, secure the end of the line around the metal ring and the bead strand and begin to wrap the fishing line around the beaded strand and the metal ring. continue this around the whole ring. when the ring has ben completely wrapped, cut the bead strand and secure the bead strand to the ring with the fishing line.

4.Cut another piece of fishing line and wrap just like before, except in the opposite direction and tie off at the end.

5. This should be your result. Repeat steps 2-4 one the remaining metal ring.

6. Decide how long you would like your dangling strands on the larger/outer ring to be. I chose 1ft. Now cut lots of strands the same size.

7. Use your glue gun to glue the first bead of each strand to a bead around the perimeter of the metal ring. Continue to glue a new strand to each bead until you've completed the the full circle.

8. This should be your result. 
9. Now move on to your smaller/inner ring. depending on how full you want your inner ring to be you can glue the strands on each bead of the ring perimeter or every-other bead.
10. Place the rings inside one another. Decide how far down you want your inner ring to hang. I chose 6in since my dangling strands were all 1ft. I then cut 3 pieces of fishing line about 9in long to give myself room to tie the ends. Tie one end of the line to the larger ring and the other end to the smaller ring making sure that there is 6in of line between the two rings. Repeat this step on two more locations of the rings making sure they are equal distances apart.
11. Combine four pieces of fishing line, each about two feet, fold in the center and make a knot just above the loop. Make two more of these.

12. Wrap one group of the line around the larger metal ring and pull the end of the group through the loop end. do this at two more locations on the largest ring, once again all equidistant. 
13. Gather the three groups of the fishing line in the center and tie them in a knot making sure that the shade will hang level. Use the excess fishing line to attach the shade to your hanging pendant or to the top of your lamp.
Voila! This is what I ended up with and I love it! I'm playing around with the idea of adding some bigger beads to the ends of the strands to add some interest to the shade, if I do I'll post pictures.