I've taken about a month and a half long hiatus from blogging anything in order to move in to our new home and to start making it livable. Hopefully soon I can put the finishing touches on the living room, laundry room, kitchen and bathroom and put up before and after pictures of those rooms in our little abode.
In the past few days I've been finishing the bathroom, Alex and I put up a pendant light in the bathroom but for about a week it has just been a bare bulb with no shade. I had been wanting something classy and glassy to compliment the glass drawer pulls and fancy gold molding in the bathroom. I wanted something like this.........

But my budget does not allow for a $300 Lamp, so I decided to get crafty and create my own classy glassy chandelier. Here's how...

1. Gathering supplies, you'll need a hot glue gun and glue sticks, two metal rings of different sizes(your choice of size dependent upon how big you want your chandelier), fishing line, bead garland(make sure you have plenty I had 90 ft and used every bit of it) which I purchased here. You may also want a measuring tape or a ruler unless you just want to eyeball it.

2. Attach the end of your bead strand to the metal ring using your fishing line to secure it tightly.

3. Cut a long piece of fishing line, secure the end of the line around the metal ring and the bead strand and begin to wrap the fishing line around the beaded strand and the metal ring. continue this around the whole ring. when the ring has ben completely wrapped, cut the bead strand and secure the bead strand to the ring with the fishing line.

4.Cut another piece of fishing line and wrap just like before, except in the opposite direction and tie off at the end.

5. This should be your result. Repeat steps 2-4 one the remaining metal ring.

6. Decide how long you would like your dangling strands on the larger/outer ring to be. I chose 1ft. Now cut lots of strands the same size.

7. Use your glue gun to glue the first bead of each strand to a bead around the perimeter of the metal ring. Continue to glue a new strand to each bead until you've completed the the full circle.

8. This should be your result.

9. Now move on to your smaller/inner ring. depending on how full you want your inner ring to be you can glue the strands on each bead of the ring perimeter or every-other bead.

10. Place the rings inside one another. Decide how far down you want your inner ring to hang. I chose 6in since my dangling strands were all 1ft. I then cut 3 pieces of fishing line about 9in long to give myself room to tie the ends. Tie one end of the line to the larger ring and the other end to the smaller ring making sure that there is 6in of line between the two rings. Repeat this step on two more locations of the rings making sure they are equal distances apart.

11. Combine four pieces of fishing line, each about two feet, fold in the center and make a knot just above the loop. Make two more of these.

12. Wrap one group of the line around the larger metal ring and pull the end of the group through the loop end. do this at two more locations on the largest ring, once again all equidistant.

13. Gather the three groups of the fishing line in the center and tie them in a knot making sure that the shade will hang level. Use the excess fishing line to attach the shade to your hanging pendant or to the top of your lamp.
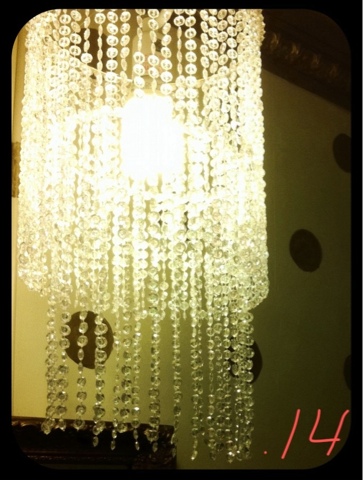
Voila! This is what I ended up with and I love it! I'm playing around with the idea of adding some bigger beads to the ends of the strands to add some interest to the shade, if I do I'll post pictures.

No comments:
Post a Comment