Saturday, August 31, 2013

Mod Woodland Hideaway

Whenever I am working on a huge project, i.e. my bedroom/bathroom, I like to fit smaller projects in, just so I can actually finish a project. 
This weekend was all about a little something for my boy. Grayson has it bad. I mean really, the kid has TWO large closets in his room. He truly is deprived. I had in mind from the time we moved in that he needed one of these closets to be a toy/play closet. I picked out which closet was going to get the boot and went to work.


Look at all this stuff! And the random cabinet that is so skinny it couldn't possibly hold anything!


There are existing shelves in the closet which make a great toy area.


I took the doors of the closet, took the shelf out of the top of the closet, cleaned out everything and shot a few photos so you could get a good idea of the space.


I primed and painted the inside of the closet.
Since the shelves in the closet were just plywood I cut trim to finish the edge of the shelf, primed and painted all the shelves.


Here are the results and the run down of what I did!


I painted the left wall and back wall of the closet Comet Dust, the same grayish white from our bathroom. I knew I wanted to highlight the mirror wall by painting it a bright sherberty green, Valspar's Island Lime.I put up Threshold velveteen curtains in beige from target to frame the doorway.


The rug is a teal wool and cotton Threshold carpet runner from Target.


The plaid yellow storage ottoman is another Threshold from Target find. The gray birch trees are decal stickers also available at Target. I bought them when we lived in our rental home. (They do travel well, I just peeled them off the wall and stuck them onto wax paper).


This fun little bird is actually a find from our basement, I painted him up and stuck him on the wall.


Grayson is really happy with his little hideaway. I think that it is easier to play now that he has all of his toys displayed for him.


The light blue bins are from dollar tree and I really love them. One of the scary things about Kansas is that brown recluse spiders are a real threat here. We have our house sprayed quarterly but I'm still really paranoid about it. The plastic bins really ease some fears because brown recluses can't climb slick surfaces so they can't get into our little boy's toys.


I picked up these great photo ledges from Menard's. They were called Stafford, so I knew I had to get them. I also picked up some shelf brackets when I was there, they were named Potomac so I think Menard's was pandering pretty hard to NOVA people. I love them though, they are a perfect place to rest Grayson's books.


I mounted this fun Ikea shade over the existing fixture (just a hanging bulb). It's really cute and diffuses the light nicely.


I think Grayson is pretty happy with his own little space for fun and I'm happy to do such a fun project for him!


Follow my blog with Bloglovin

Friday, August 23, 2013

Bathroom Reno {Part 3, Concerning Plank Walls and Bathroom Sinks}.

Let me take you back to what our bathroom looked like before I ever touched it.


and after a few weeks of demo, the right hand wall looked like this...


Goodbye medicine cabinet!!!
Hello nasty sink!


Clearly it needs some help. 
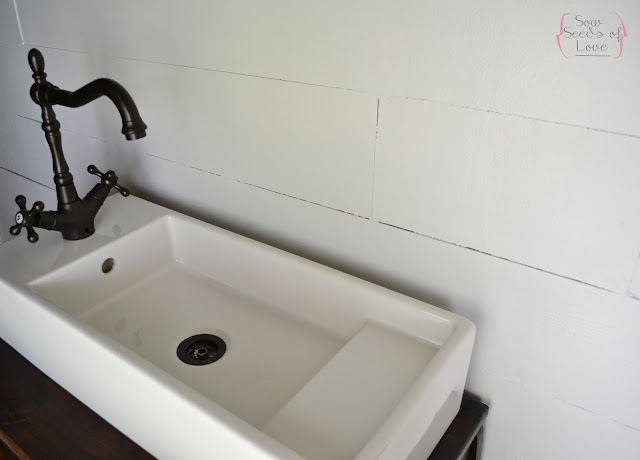
I always knew which sink I wanted. The Lillangen sink from Ikea.


We bought up our dream sink for a good 70$ (We didn't need the wall brackets that were included into the price in the photo)


I found a great table at a local antique store that our sink would fit on beautifully. The table even has a place for my Hubby to keep his bathroom magazines ;)
I took the drawer out while I cut holes in the top for the drain pipe and water lines to run though; that's why it isn't pictured.

Now, before I show you any "after" pictures I need to show you what I have been inspired by lately.......
PLANK WALLS!!!!


Source: Pinterest


Source: Pinterest


Source: Houzz

I love how beautifully beachy they look. I've been pinning them like crazy on Pinterest lately.
I plan on decorating our bedroom/bathroom area with a coastal feel and these plank walls would be perfect!

I decided to start on a plank wall of my own. I read a few blogs in which people chronicled their own planking journeys and it really seemed fairly simple. I picked out a few 4x8 sheets of plywood veneer/underlayment/luan, whatever you may call it and had the sales person cut the boards into 6 inch wide strips. 
Every tutorial and blog I read about planking, the plankers used a nail gun to attach their boards to the wall. I do not own a nail gun and don't have a need to invest in a nail gun and air compressor at the moment so I decided that liquid nail and finishing nails were good enough for me. I was able to glue and nail my boards up quite easily all by myself. I made sure to vary the lengths of the boards, making sure the seams did not line up vertically.
(note the new light fixture too)


I primed and then painted the boards a Valspar color called Totten's Landing. It is such a pretty soft white. But then I had a grand realization that it was too warm. I needed a grayer, cooler white for the space. I also came to the conclusion that I wasn't wild about the light in this space.
A few things about the light. 
It's an Allan + Roth from Lowes, it was on sale for $19.99 and it's pretty cool. But I'm not wild about the Edison light bulb. it casts a YELLOW glow, a REALLY YELLOW glow. Not cute. I could replace the Edison bulb with a regular bulb, but I think that the globe around the bulb hangs down much to far. The fixture is really just too large for the space. So I decided this fixture could be used somewhere else, but not here.


Here is the new paint color up on the walls along with the sink and faucet in place.


The wall color is Valspar, Comet Dust. It's a really beautiful barely gray, white. The gray will flow quite nicely into the carrera marble tiles we have picked out for the shower.
The faucet is an Ebay find. ( There are TONS of international retailers who use Ebay as a means to sell their products and always have faucets and such available at a really reasonable price.)


I am IN LOVE with this sink, it gives so much space horizontally, for not taking up more than 10 inches in depth. it also mimics the shape of the room which really works in the space and almost makes the room feel larger.


The Floating shelves are Threshold brand from Target.
Our light fixture is from Lowes. It's actually from the outdoor lighting section. Portfolio Outdoor Wall Lantern. The knob right under the light fixture goes to a mirror that is not pictured yet, for the sake of suspense ;)

There will hopefully be more up soon, things are really moving along over here!

Linking up at Craft Dictator.


Thursday, August 22, 2013

Kitchen Quick Change

I'm still plugging away at our master bathroom but sometimes when I find a stopping point I throw in a few projects from here and there around the house.
Last week I decided to orchestrate the painting of a chalkboard wall. I love kitchen chalkboard walls! And if I can't have a whole wall devoted to chalkboard I at least incorporate a chalkboard of some sort.... come to think of it I've had some form of chalkboard in every kitchen we have lived in since we've been married, and so far that has been 4 different kitchens. 

I did a big no-no and forgot to take the token "before" shot. Actually I thought I already had one, but to my dismay I never took a photo of the wall as is. Just picture a greige wall with a white chair rail and a doorway in the center.


There are lots of good tutorials and chalkboard paint recipes on Pinterest. I really like this tutorial from A Beautiful Mess. But I always make sure I use an oil-based paint. I used Rust-oleum brand but I'm sure any oil based paint works just fine. The oil-based paint really adhere's to the surface of whatever you are painting and stands up to wiping with wet paper towels and sponges much better than water based paint.

Another tip if you make your own chalkboard or chalkboard wall... Never skip the "seasoning" step at the end where you are instructed to cover the whole area with chalk and then rub it around. if you don't whatever you write on your chalkboard will be REALLY hard to get off.


Originally I had planned to only paint the top half of the wall, but after I painted, the chair rail just really bugged me ALOT! I liken it to putting a really thick belt on a short-waisted person, it just made the room feel squished and short.


I pulled all of the chair rail off only to reveal about three layers of wallpaper underneath. I soaked and scraped off the wallpaper. The wall I was painting on isn't even drywall! It's paneling that has been spackled in the grooves to make it smooth. I didn't know that before I peeled the wallpaper off. It wasn't a big deal, I just touched up any spackle that was damaged or missing and then continued my chalkboard paint.


I really like the contrast the black chalkboard wall gives to the space, it makes the bright colors of my framed seed catalogs and our ceramic pig, Henry really POP.


I have to say, I'm so proud of my new chalkboard wall. For being such a quick project it sure has a dramatic result.


Saturday, August 10, 2013

An Open Door Policy.

You might remember this hallway from our "Big Announcement" post.


This is our downstairs hallway.
The room straight ahead is a bedroom, the door on the left leads to the dining room, the right, directly across from it is a bathroom. The white door on the right is a closet and the doorway I'm standing in is an entrance to a formal living room/ extra guest room.
So count them up people that's 5 doors! Not doorways, DOORS! Enjoy these two embarrassing photos of the hallway. This one, directly below is looking in from the dining room (the reason the door is backward is because I had already removed it, I leaned it up and snapped a pic for the blogs sake).


I needed to diagnose what the problems were in this hallway and then fix them. 
1. problematic number of doors.  
Taking down the door to the dining room and the door to the formal living room would really open up the hallway and give it some flow.
2. Ugly wood trim.
I'm not fan of wood trim, I'm just not and I make no apologies. I think we can all agree that this wood trim along with the doors made our hallway feel closed in and scary. I knew that I needed to paint it all a crisp white, and then it would all match the random white closet door as well. 
3. The wall color itself. 
The wall color in the hall was way different than any color in the rest of the house. these pictures don't do it justice. The dining/living area is a really beautiful greige and the hallway was a sicky yellowish pinkish white, not cute! 
4. The "boob" light.....
it looks like boob, look at it! It just needed to go.


So I took down all the doors, spackled, sanded, spackled some more, sanded some more and then they were perfect and ready for paint.


There is my crisp white trim and my new wall color. It's a dark taupe-y color. It looks really nice, especially from standing in the dining room contrasting against the lighter greige wall.
CHECK OUT THAT CHANDELIER! 
There are no words except PERFECT. 


Here is the update from the first picture's vantage point, looks great huh? 
I can't wait to get some pictures and things up on the wall.
There is one more detail that didn't make the final shot.


The closet door had this....charming door knob that we all disliked very much. 


I simply replaced it with one from a discarded door and now all of the door knobs match.

Hope you enjoyed our hallway update :)


Bathroom Reno {Part 2, When Hardwood and Plywood Collide & Updating Our Bedroom floor}

So when I left off last in my bathroom adventure I had found hardwood under linoleum and a whole bunch of glue. 


So I got down to business pouring on the varnish stripper to unleash my floor's hidden potential. I decided that this wood be a perfect time to update our bedroom floor as well, our bedroom and bathroom flow right into one another so that was the only logical thing to do. I used Citristrip and my very sophisticated mop tool (just a rag attached to a Swiffer mop) to spread the Citristrip on the floor.


I didn't have to spread the stripper on very thick and I let it sit for about 45 minutes and the stripper was able to easily remove all of the varnish from my floor. I used a scraper to remove the Citristrip and varnish goop and lots and lot of rags aka old t-shirts.


 My next issue was the giant piece of plywood surrounding the "toilet hole".


 Most of the plywood will be covered by the toilet but there is a section to the left that really stuck out. I decided that I could cut out that section and replace it with hardwood and then stain it to match the floor.


It took a hammer, drill, dremel and a jigsaw but I was finally able to cut out the eyesore-ish plywood piece.


I cut pieces of oak plank to fit my space and used my Dremel to smooth out edges.


After my wood filler was dry and my oak pieces set into our empty floor space, and problem solved!! Now I was ready to get down to business and stain my floor!! 


Even though I stripped the floor it was still kind of covered in dried residue and soap water and a mop wasn't exactly getting my floor clean...


I thought rubbing alcohol might work better....and it did!!


I used rubbing alcohol and a scrubby sponge with a handle and go all of the icky residue off the floor.


The alcohol evaporates much much quicker than water so you aren't left with weird water marks, plus you are able to stain the floor sooner, rather than waiting a hours for water to dry completely.


I love the way these dark stained, lovingly worn floors look. 
I knew this was the look for me!


So I chose Rust-oleum's Kona wood stain, it's a really pretty dark stain. I used the little staining sponges that I found on the aisle next to the stain and wiped the excess off with an old t-shirt. This formula is really great and each coat dries in about an hour so you can reapply to to deepen the color pretty quickly.
This is after one coat of stain..


I was really impressed with how well the color took in just one coat. I've never stained a floor before now, I was a little nervous but I was surprised at how easy and user friendly the whole process was.
This is after three coats


               Just a side note: The reason these bathroom floor pictures look so shiny is because the coats of stain are still wet. I couldn't wait! I had to take their pictures! I then got                                     busy staining the rest of the floors in our bedroom.


Next was varnish time! remember when I said I like the "Lovingly Weathered" look? Well that's why I chose satin for our floor finish. I didn't want our floors super glossy, I just wanted them to look soft and time worn. I used this Varathane finish and it too is fast drying, has no odor and was really easy to use... it's basically perfect.
I found the floor finish moppy thing beside the floor finish. It too was really simple, just like mopping but just making sure I was applying in nice even coats. the floor finish is a hazy, cloudy bluish white when it's wet so it is really apparent where you have applied it and where you haven't.

Here is what our floors looked like before....

 They aren't HIDEOUS but they are obviously stained in certain spots, scratched in others and I'm really just not wild about the tone.
I'm much happier with our dark stained floors, I think they are beautiful and will contrast really nicely with our soon to be white trim!

And here is the after. AHHHHHHH! Go ahead, take it in.